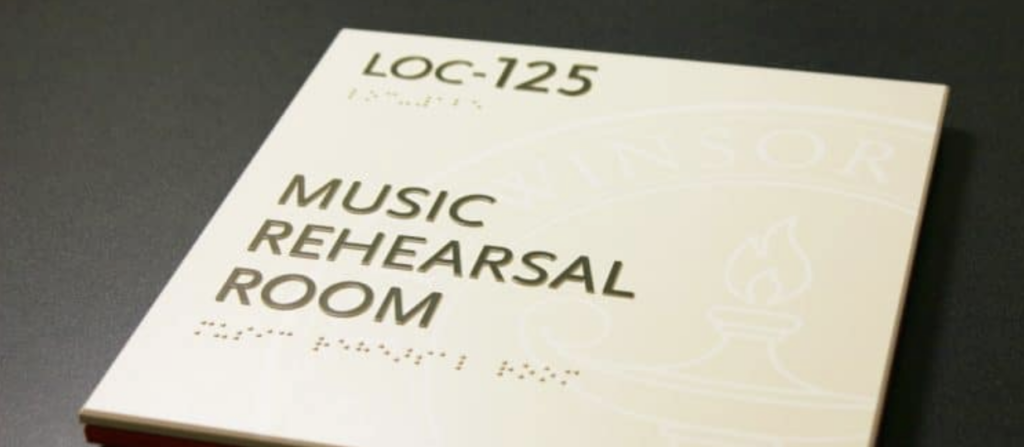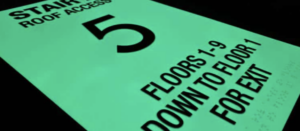
Making ADA braille signs is an art and science perfected by Nova Polymers. Our innovative 5-step process ensures the production of durable, accessible signage that meets strict standards while offering customization options.
Making ADA Braille Signs in 5 Easy Steps
Let’s dive into the fascinating journey of making ADA braille signs.

Step 1: Workflow Manager
The process begins with Nova Polymers’ proprietary Workflow Manager software. This powerful tool combines design capabilities with braille translation, allowing fabricators to make ADA braille signs. The software streamlines the design process, ensuring that all text, symbols, and braille elements are correctly positioned and formatted according to accessibility guidelines.
Step 2: InkStar Film Solution
Once the design is finalized, it’s time to create the film negative. Nova Polymers’ InkStar Film Solution prints high-density negatives and positives with exceptional clarity. This crucial step ensures that the final photopolymer sign will have crisp, well-defined raised elements.
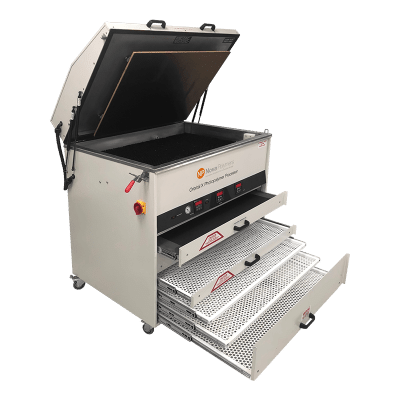
Step 3: Orbital X Processor
The heart of making ADA braille signs lies in the Orbital X Photopolymer Processor.
This advanced machine handles multiple steps:
- Contact with Film Negative: The high-density film negative is placed on top of the photopolymer sheet.
- UV Light Exposure: A bank of UV lamps shines through the clear areas of the film negative, exposing and hardening specific parts of the photopolymer material.
- Washout: The unexposed photopolymer is washed away using plain tap water. This biodegradable effluent goes directly down the drain, making it an environmentally friendly process.
- Drying: The moisture is evaporated from the sheet’s surface.
- Post-Exposure: A final UV exposure fully cures and hardens the photopolymer, completing the processing stage.
Step 4: Cutting and Shaping
After processing, the photopolymer signs are ready for cutting. Depending on the project requirements, sign makers can choose from several methods:
- CNC Router: Ideal for complex shapes and large quantities.
- Laser Cutting: Perfect for intricate designs and smaller runs.
Shearing: The ACU cutter 19-inch tabletop finishing shear is used for straight cuts on signs up to 1/8 inch thick, providing a clean, finished edge.
Step 5: Color Pro Ink Tipping Machine
Adding color to the raised elements of the sign is the next step. Nova Polymers’ Color Pro Ink Tipping Machine revolutionizes this process:
- It applies ink evenly to raised copy, images, or borders within 3-4 seconds.
- The machine handles standard ink brands, offering flexibility in color matching.
- It accommodates sign thicknesses from 0.020″ to 1″.
- Clean-up and color changes take less than 15 minutes, improving efficiency.
This innovative machine significantly increases production speed and quality while reducing costs for sign makers.
Step 6: Quality Control and Finishing
The final stage involves a thorough quality control check to ensure every sign meets Nova Polymers’ high standards. Some signs may receive an optional clear coat for added durability. Finally, the signs are carefully packaged and shipped to their destinations.
Ready to Begin Making ADA Braille Signs?
Nova Polymers is your trusted partner for innovative photopolymer equipment and materials that streamline the process while ensuring compliance and quality. Whether you’re looking to adopt our cutting-edge Workflow Manager, explore the Orbital X Processor, or enhance your designs with the Color Pro Ink Tipping Machine, we have the tools and expertise to support your success.
Contact Nova Polymers today to discover how our simple ADA braille sign making process can transform your signage production. Let’s create accessible, durable, and visually stunning signs together!