An ADA site audit is an essential process for ensuring that your business complies with the Americans with Disabilities Act (ADA) and provides a welcoming and accessible environment for all visitors. Conducting an ADA site audit helps identify areas where accessibility can be improved, minimizing legal risks and fostering an inclusive atmosphere. In this blog, we’ll walk you through five important steps to creating a comprehensive ADA site audit, ensuring your business is fully compliant with accessibility standards.
What Is an ADA Site Audit?
An ADA site audit is a thorough evaluation of a facility’s accessibility for individuals with disabilities. This audit includes examining architectural features, signage, parking, entrances, restrooms, and other areas that could present challenges for people with mobility, vision, or hearing impairments. By conducting an ADA site audit, you can identify barriers to access and make necessary changes to ensure compliance with ADA regulations.
Step 1: Review of Site Accessibility Features
The first step in any ADA site audit is to thoroughly assess the site’s accessibility features. This includes evaluating:
- Entrances and Exits: Ensure that doorways, ramps, and thresholds are wide enough for wheelchair access and that automatic doors function correctly.
- Parking Spaces: Verify that designated accessible parking spaces are available and meet ADA requirements for size and proximity to entrances.
- Pathways and Walkways: Make sure all paths are clear of obstructions and have a smooth, even surface suitable for mobility aids.
By reviewing these elements, you can identify potential barriers and begin prioritizing areas for improvement.
Step 2: Evaluate Signage for ADA Compliance
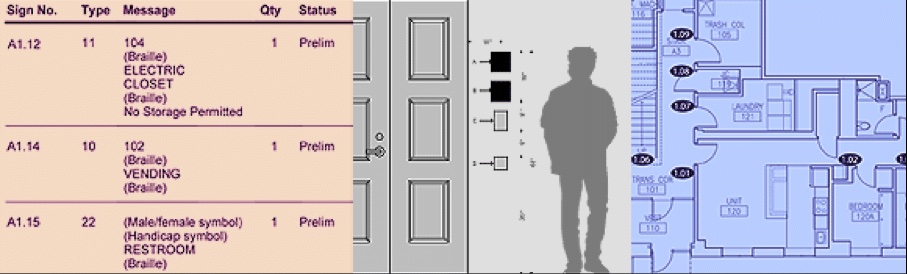
Clear and effective signage is essential for accessibility. An ADA site audit should include a review of signage to ensure it meets the standards for visibility, legibility, and tactile features. Focus on the following:
- ADA-Compliant Braille Signage: All permanent rooms and spaces should have tactile signage with Braille.
- Visual Contrast and Readability: Ensure that text is easily readable, with high contrast against background colors.
- Directional and Informational Signage: Check that signs clearly guide individuals with disabilities to essential areas like restrooms, elevators, or entrances.
Accurate and clear signage is critical to providing effective wayfinding and ensuring accessibility for all visitors.
Step 3: Inspect Restrooms and Other Key Areas
Restrooms are one of the most important areas to evaluate during an ADA site audit. Check the following:
- Doorways: Ensure restroom doors are wide enough to accommodate wheelchair users.
- Stall Sizes: Verify that stalls are large enough to allow a wheelchair to turn around and provide adequate space for maneuvering.
- Sink and Counter Height: Ensure sinks, mirrors, and counters are at accessible heights for wheelchair users.
- Grab Bars: Make sure grab bars are installed in appropriate locations for safe use.
Beyond restrooms, other key areas, such as elevators, counters, and meeting spaces, should also be assessed for accessibility.
Step 4: Conduct a Digital Accessibility Check
In today’s digital age, an ADA site audit extends beyond physical spaces. It’s equally important to assess your website and digital presence for compliance. Key areas to evaluate include:
- Website Navigation: Ensure your website is easy to navigate for individuals with disabilities, including support for screen readers and keyboard navigation.
- Alt Text for Images: Use descriptive alt text for images to ensure that individuals with visual impairments can understand the content.
- Video Accessibility: Provide captions and transcripts for videos to ensure people with hearing impairments can access content.
Digital accessibility is just as crucial as physical access, and this step should not be overlooked.
Step 5: Create an Action Plan for Improvements
After completing the ADA site audit, it’s time to compile the findings and create a comprehensive action plan. Prioritize issues based on their impact on accessibility and cost of resolution. Set realistic timelines for making improvements and ensure all necessary resources are in place.
This action plan should include both short-term fixes (such as installing signs or making minor adjustments) and long-term goals (such as structural changes to entrances or restrooms). Working with ADA experts or contractors can help ensure that any modifications are done correctly and meet compliance standards.

The Importance of an ADA Site Audit
Conducting an ADA site audit is a crucial step in ensuring your business is accessible and welcoming to everyone. By evaluating key areas like entrances, signage, restrooms, and digital accessibility, you can identify areas for improvement and make the necessary changes to comply with the ADA. An accessible site not only avoids potential legal issues but also enhances the experience for all visitors, helping you create a more inclusive and welcoming environment.
Start your ADA site audit today to ensure your business remains compliant and accessible for all!