As a sign fabricator specializing in photopolymer ADA/braille signage, understanding and implementing the correct ADA mounting heights is crucial for ensuring compliance and accessibility. This comprehensive guide will simplify the complexities of ADA mounting heights, helping you create and install signage that meets federal regulations and serves all individuals, regardless of their abilities.
The Importance of ADA Mounting Heights
Proper ADA mounting heights are not just a legal requirement; they’re essential for creating inclusive environments. When signs are installed at the correct height, they become easily accessible to people with visual impairments or those using wheelchairs. This attention to detail in mounting heights can make a significant difference in how people navigate and interact with spaces.
Understanding ADA Mounting Height Requirements
The ADA Standards for Accessible Design provide specific guidelines for sign installation. Here are the key points to remember:
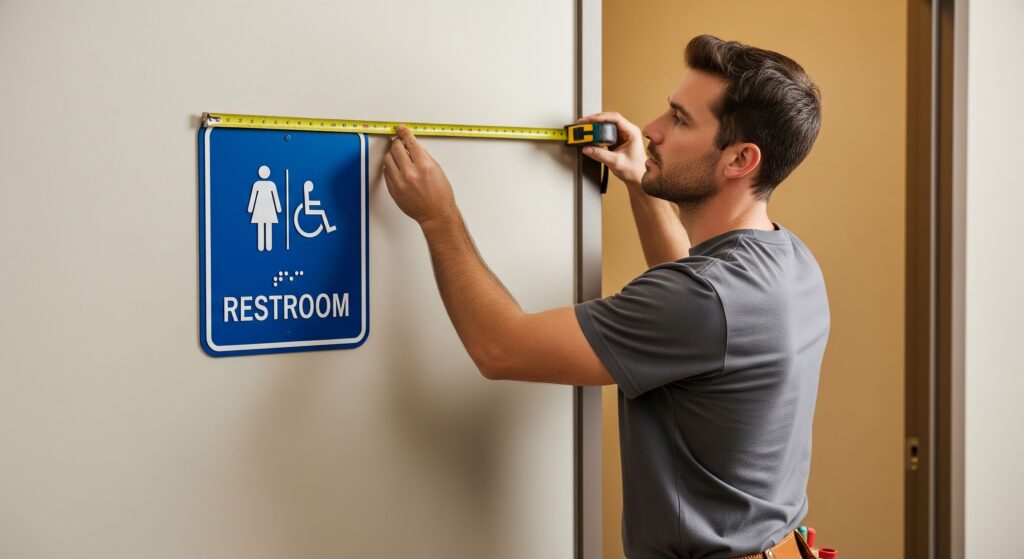
- Height Range: The baseline of tactile characters must be mounted between 48 inches minimum and 60 inches maximum above the finished floor or ground surface.
- Measurement Point: This height is measured from the baseline of the lowest tactile character to the baseline of the highest tactile character.
- Consistency: It’s recommended to maintain a consistent mounting height throughout a facility for a uniform user experience.
Specific ADA Mounting Heights for Different Sign Types
Room Identification Signs
- Location: Mount on the latch side of the door.
- Distance from Door: Center the sign 9 inches from the edge of the door frame.
- Height: Ensure the baseline of characters is between 48-60 inches from the floor.
Overhead Signs
- Clearance: Must have a minimum clearance of 80 inches above the finished floor.
Wall-Mounted Signs
- Height Range: Mount between 27 inches (minimum) and 80 inches (maximum) above the finished floor.
- Protrusion: Should not protrude more than 4 inches into pathways.
Post-Mounted Signs
- Height: For signs with leading edges between 27-80 inches high, protrusion should not exceed 12 inches.
- Clearance: Signs with bottom edges above 80 inches or below 27 inches can protrude any amount.
Best Practices for ADA Mounting Heights
- Consistent Installation: Maintain uniform mounting heights throughout a facility for easier navigation.
- Clear Path: Ensure an 18×18 inch minimum clear floor space in front of each sign.
- Avoid Obstructions: Keep the area around ADA signs free from obstacles for easy approach and reading.
- Regular Inspections: Periodically check signs to ensure they remain compliant and in good condition.
Photopolymer Signage and ADA Compliance
As a sign fabricator using Nova Polymers’ photopolymer materials, you’re well-positioned to create high-quality ADA-compliant signage. Photopolymer signs offer several advantages:
- Fine Detail: Excellent for reproducing small, intricate designs and logos.
- Flexibility: Thinner base materials work well in curved frames.
- Versatility: Available on various base materials, including aluminum and photoluminescent options.
- Customization: Can be surface or subsurface painted in any color combination.
- Durability: The photopolymer process creates long-lasting, tactile signage.
When creating photopolymer ADA signs, remember that the mounting height requirements apply to the tactile elements of the sign. Ensure that your design allows for proper placement of raised characters and braille within the 48-60 inch range when installed.
Tips for Sign Fabricators
- Design with Installation in Mind: When creating your photopolymer signs, consider the final mounting location and height. Design the layout so that tactile elements will fall within the required 48-60 inch range when installed.
- Provide Installation Instructions: Include clear mounting instructions with your signs to ensure proper installation by the end-user or installer.
- Offer Consultation Services: Consider offering installation consultation or services to ensure your expertly crafted signs are mounted correctly.
- Stay Updated: Keep abreast of any changes to ADA regulations that might affect mounting heights or sign design requirements.
- Use Templates: Develop templates or guides that can help streamline the design process while ensuring compliance with ADA mounting height requirements.
By mastering ADA mounting heights and creating high-quality photopolymer signage, you’re not just complying with regulations – you’re contributing to more accessible and inclusive environments. Remember, proper mounting is as crucial as the sign design itself in achieving full ADA compliance.
As a sign fabricator partnering with Nova Polymers, you have the tools and materials to create exceptional ADA-compliant signage. By combining your craftsmanship with accurate ADA mounting heights, you’ll deliver solutions that meet legal requirements and enhance the user experience for all individuals, regardless of their abilities.

